Add Building Storeys
From user interface
- Import or open the model with the missing building storeys
- Open the Containment Editor workspace, which can be found in the Edit section of the ribbon under Organize Model
- Right-click on a Building in the Containment palette and select ‘New Building Storey’ from the context menu
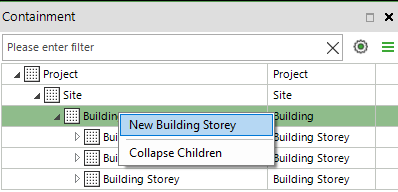
- Give a the Name and Elevation in the New Building Storey dialog, and click OK
As the result a new empty building storey is created in the building you selected. Now you can start assigning objects to the new building storey.
From template
You can automate adding building storeys to your model from a template using the Auto-Assign Containment: Building Storeys tool. General instructions for running a tool from a template can be found here.
| Field | Value |
| Name or GUID | Auto-Assign Containment: Building Storeys |
| Sequence | Before TemplateUnless you have a good reason to user another value |
| Parameter#1 | SCOPE=ALL |
| Parameter#2 | ADDBUILDINGSTOREYS=Name=<name1>;Level=<level1>|Name=<name2>;Level=<level2>If you want to first delete all existing building storeys and then add, please use OVERRIDEBUILDINGSTOREYSExample: ADDBUILDINGSTOREYS=Name=Ground;Level=0|Name=First;Level=3000|Name=Roof;Level=6000 |