Calculate Quantities – Quantity Descriptions
Simplebim calculates quantities based on the geometry of objects. Because of this, it doesn’t matter which model author tool was used for creating the models or who made them. Simplebim always calculates the quantities with the same logic in a consistent way. Thus quantities are comparable between different models and even between different projects. In other words, Simplebim calculates standardized quantities.
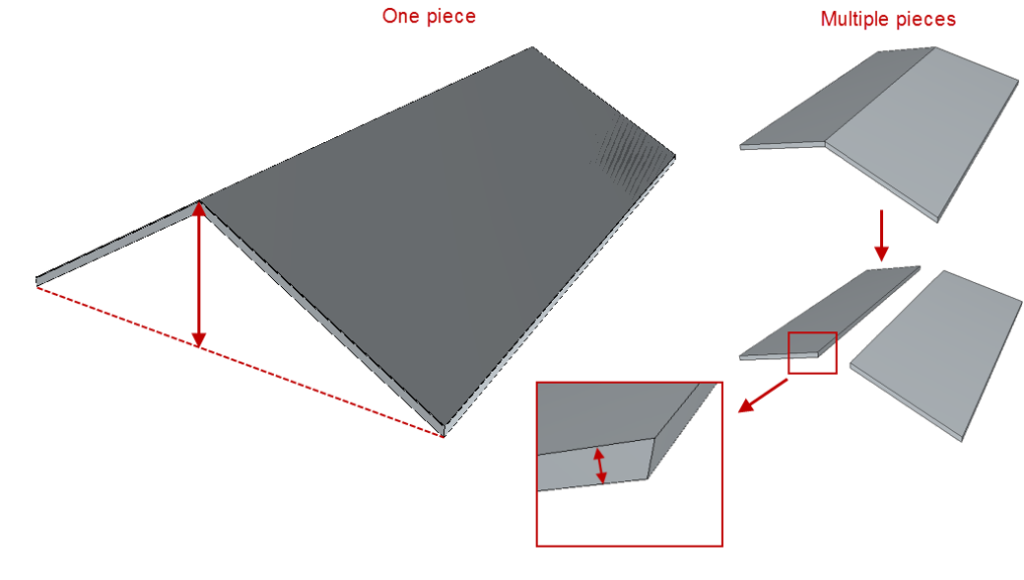
Quantities are calculated both for object instances and container objects. For example, a wall can either be an instance with single geometry or it can be an assembly with several child objects, which each have their own geometry and thus also their own quantities.
Quantities can be calculated for objects from any object class. So the wall doesn’t have to be modeled as a wall, and you can still calculate the quantity you need for it.
Geometry-based quantities can be calculated with different kinds of techniques. Which one is the best for you depends of course on your use case. This applies both to areas and dimensions. Sometimes you need a shadow (projected) area of the objects, and sometimes the area of the actual surfaces of the object. Sometimes you simply need to know the longest side of the object. Sometimes you need to restrict the dimension calculation to some axis. Calculate Quantities tool allows all this and more. See more details below.
Visualizing the Quantities
The question we many times hear, is how to make sure, that the quantity you have measured is the right quantity for your use case. With Calculate Quantities you can visualize the quantities by using the Create Derived Objects option. See more details from the Calculate Quantities documentation.
Pro tip: Once you have created the derived objects and enriched them with data, you might find, that they are exactly what you need in your QTO, and create your BOM or BOQ based on them instead of the original objects.
Calculate Quantities: Volumes
Volume Net can be calculated for any object, which has a solid 3D geometry. It cannot be calculated for open surfaces or 2D objects.
Volume Net
Volume Net takes into account the opening and holes in the geometry. It is basically the measure of the volume, which you see in the 3D window.
Weight
Weight is a derived measure. It is calculated with the following formula: Volume Net * Density for Weight. By default, the density is 7850kg/m3. Density can be set with the Density for Weight parameter.
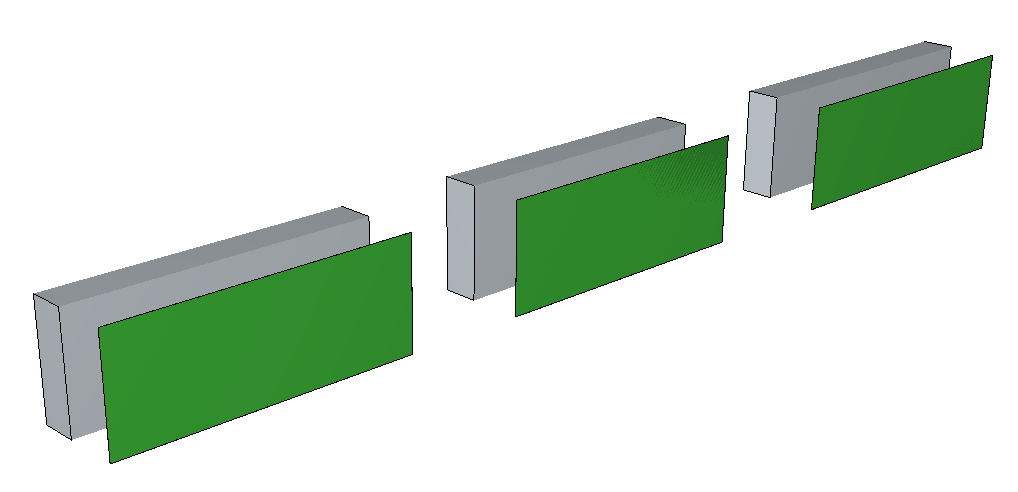
Calculate Quantities: Shadow Quantities
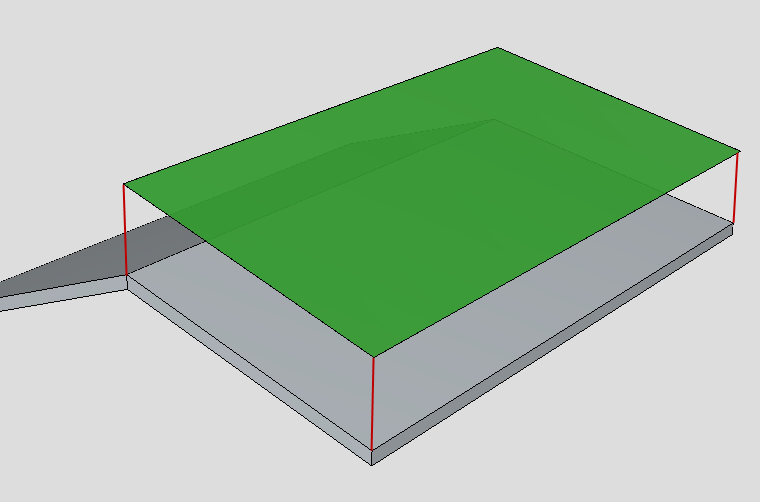
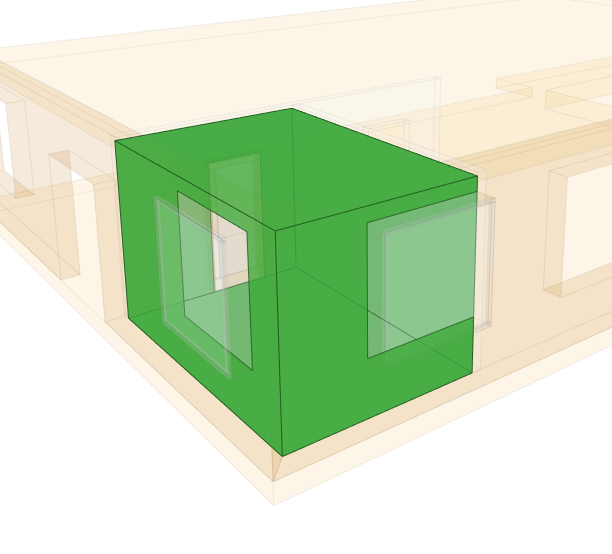
Shadow areas are calculated based on the object’s shadow that is projected onto a plane. It is like you would place a lamp on the other side of the object and a canvas on the other side. The light casts the object’s shadow on the canvas.

Building element objects can have complex geometry. Usually, the surveyors don’t want to take into account all the details of the geometry, especially when measuring areas. The great benefit of using shadow areas is, that it simplifies the calculation. An extreme example of this is a hollow core slab. The area that is used for pricing is based on the ‘shadow’ top area of the object and not the actual area of the top surface, which is much larger.
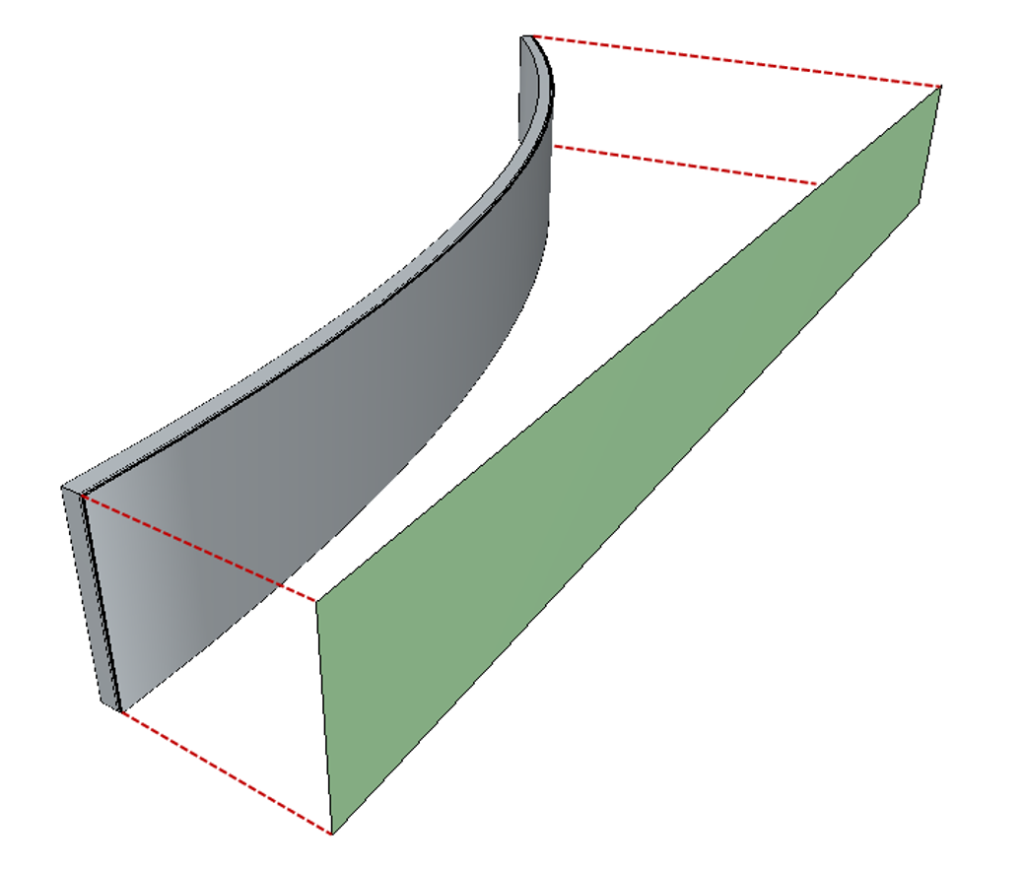
However, shadows don’t work in all cases. For example, if you want to calculate a surface area of a curved wall, then the shadow doesn’t give you the right result.
The shadow area can be gross or net. If you don’t want to take into account the openings in the shadow, then you use the gross areas. If you want to take them into account, use corresponding net areas.
In Addition to this, the opening areas are separately available.
Furthermore, you get the outer and inner perimeters of the shadow boundaries.
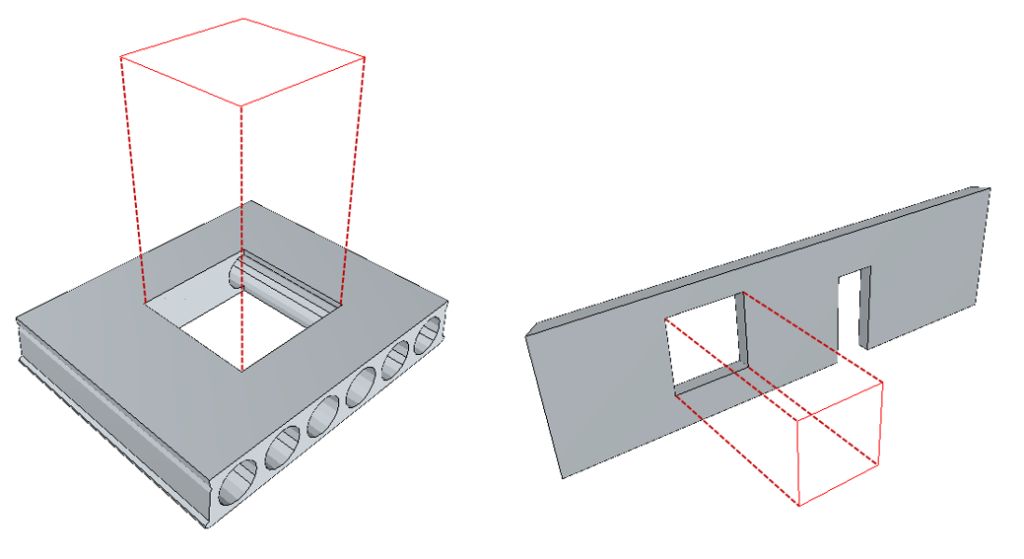
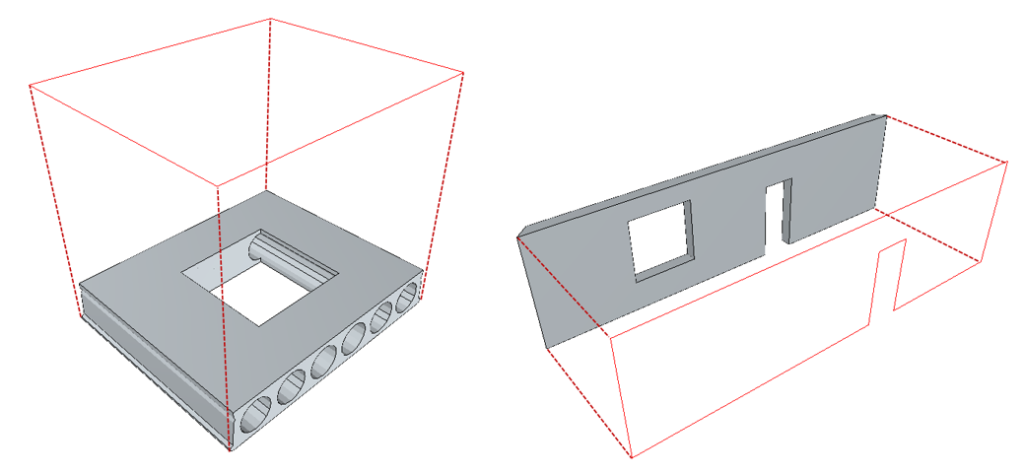
Area Shadow Gross and Area Shadow Net
Shadow (projected) area of an object. Note that by default the shadow is projected to the largest detected side of the object. You can restrict this to the horizontal or vertical sides by using the Shadow Direction parameter. See more from the Calculate Quantities Tools main documentation.
The net area of the object’s shadow takes into account the openings in the shadow.
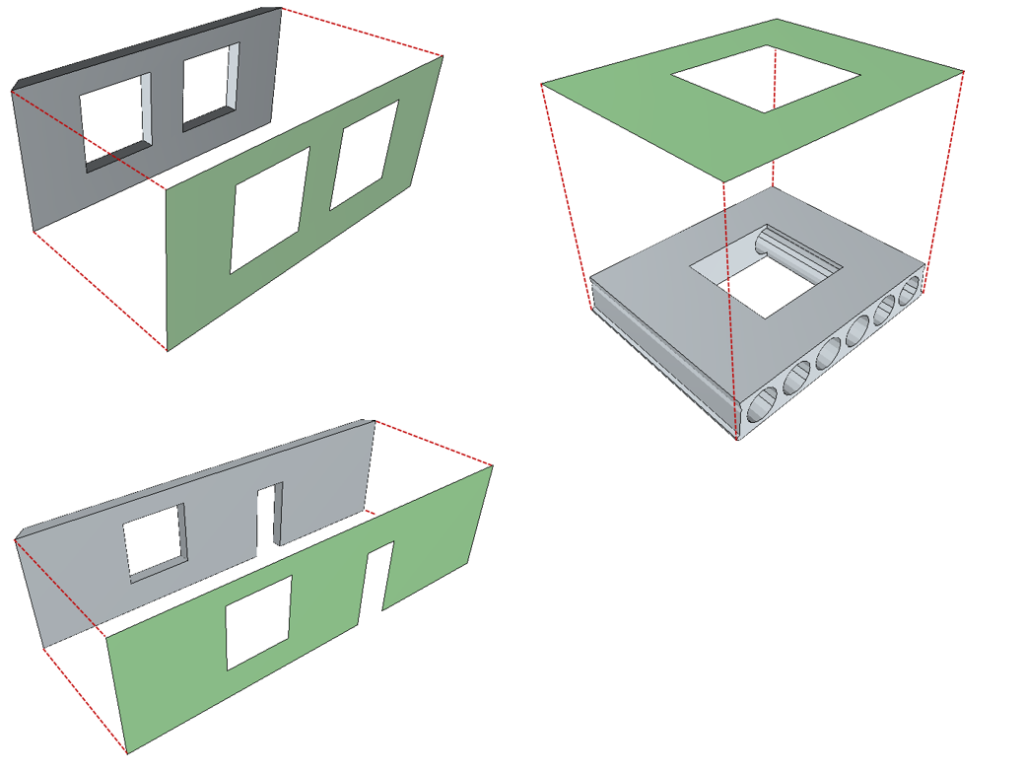
The gross area of the object’s shadow does not take into account any openings in the shadow. Note that in the wall example below, the door is not opening as such, rather it is a notch since the opening goes all the way to the edge of the hosting wall object. If you want to consider this as an opening you need to use other techniques.
Area Shadow Openings
The area of the openings in the object’s shadow.
Count Shadow Opening
The number of openings in the object’s shadow.
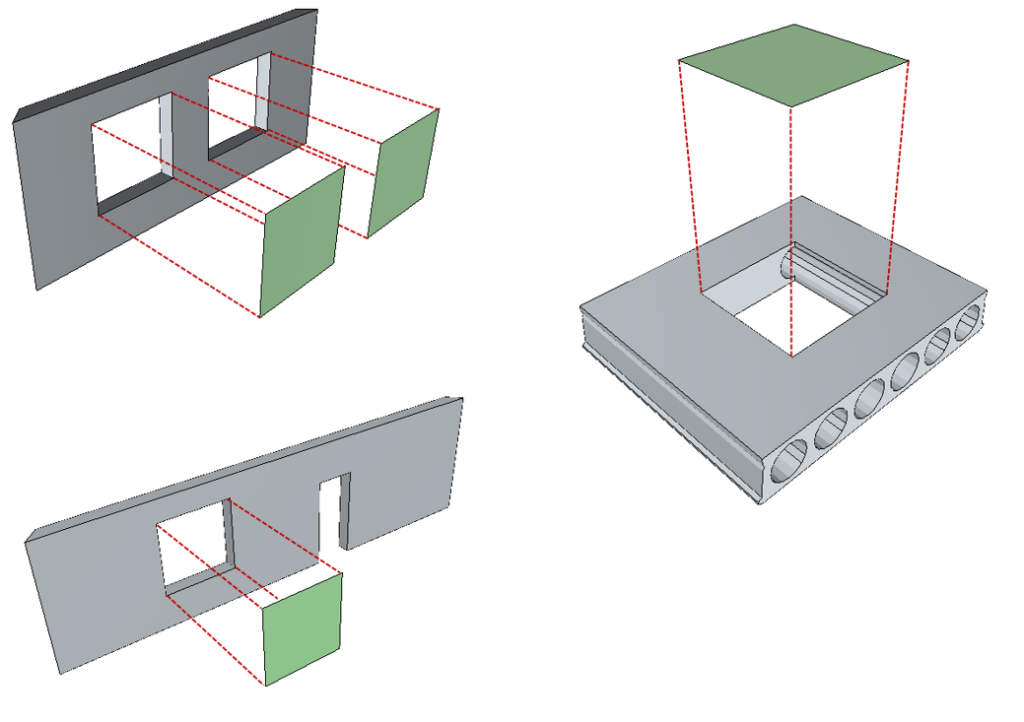
Perimeter Shadow Inner
The sum of the perimeters of all openings in the object’s shadow. There can of course be many.
Perimeter Shadow Outer
The outer perimeter of the object’s shadow.
Calculate Quantities: Surface Areas
Surface-based measures are areas calculated from a specific set of surfaces of the object’s geometry. Surfaces are flat areas in the geometry separated by hard edges. Usually, the surfaces for a specific calculation are selected based on their direction. The benefit of the surface-based quantities is, that they take into account all the details in the geometry, unlike the shadow-based areas.
As a surveyor, you don’t always want to take into account all the details. For complex geometry, the surfaces that the calculation uses might not be the ones you expect. A good example of this is wall geometry, which has multiple layers in it. Since all the layers are modeled into the geometry, and they are all pointing in the same direction, the surface-based calculation takes them all into account. In this kind of case, we recommend using shadow-based quantities.
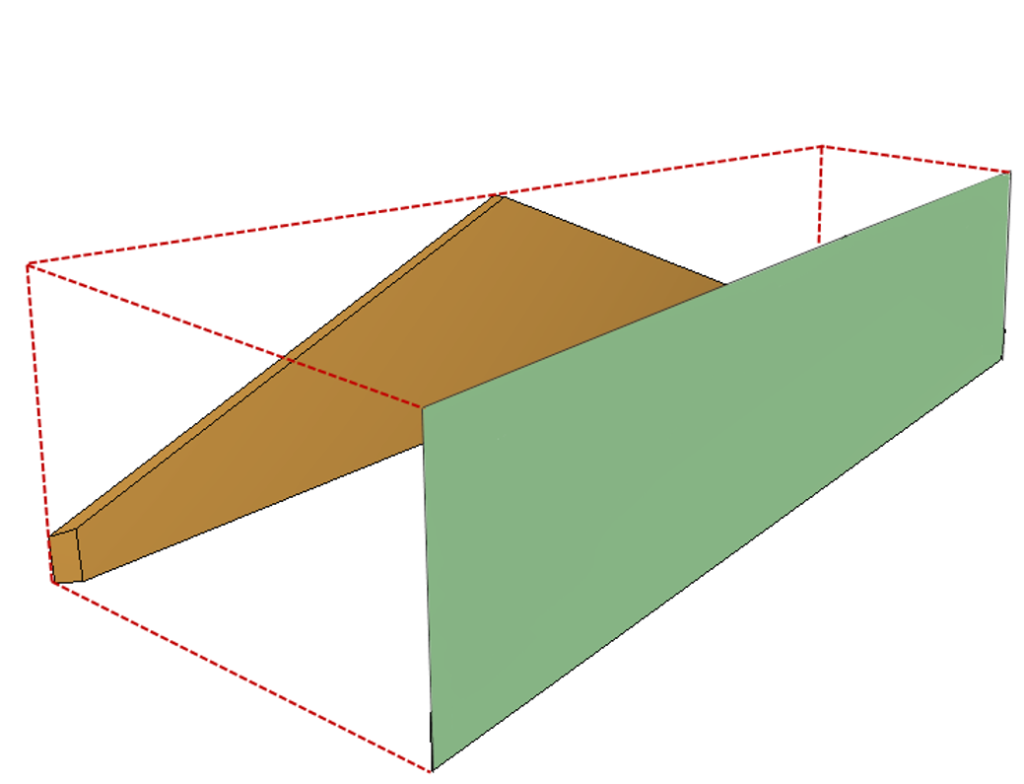
Area Bounding Box
Area of the largest side of the object’s bounding box.
The tool finds the smallest bounding box for the object’s geometry. Based on this it calculates the area of the largest side of the bounding box.
Area Bottom Gross and Area Bottom Net
The total area of all the downward-pointing surfaces of the object.
The gross area does not take into account the openings. The net area does.
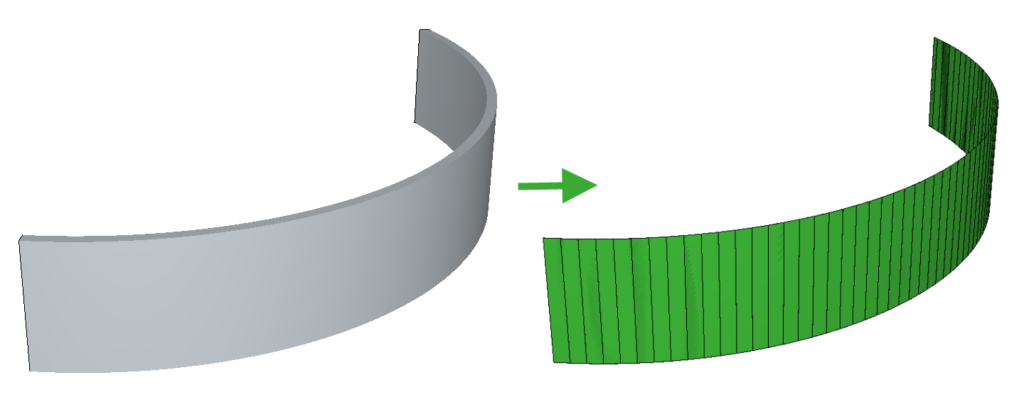
Area Largest Gross and Area Largest Net
The total area of the largest surfaces of the object.
The gross area does not take into account the openings and the surfaces within the openings. The net area does.
Note that sometimes a building element can be represented with multiple separate pieces of geometry. A good example of this is a strip wall. The Area Largest Gross and Net take into account all the surfaces in the same surface as the largest one. So in the case of a strip wall, all the surfaces on the largest side would be included in the result.
Area Largest Gross and Area Largest Net also takes into account the curved surfaces. So if you want to calculate an area of a curved wall, these are the quantities to use.
Area Sides Gross and Area Sides Net
The total area of all the side surfaces of the object excluding upward and downward pointing surfaces.
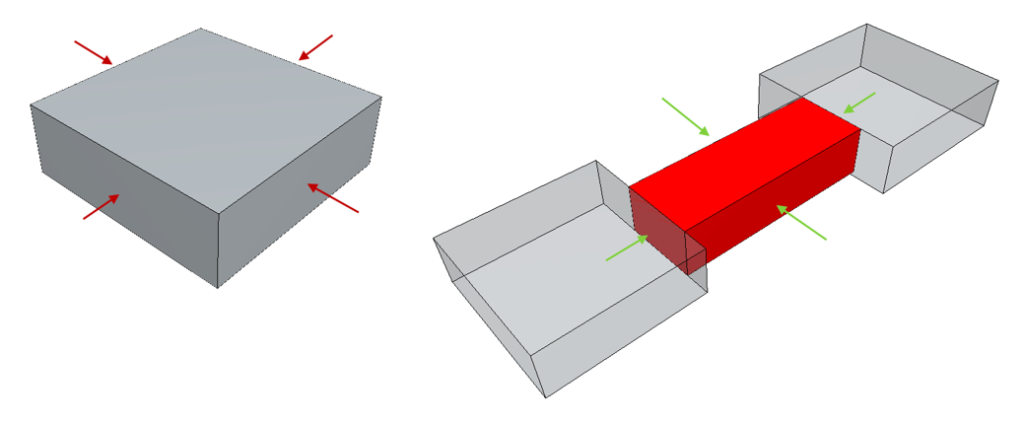
The gross area does not take into account the openings. The net area does.
Cleaning up the overlapping surfaces
You can optionally clean up/subtract overlapping side areas from the result. Use the Clean Up Side Surfaces -option to do that. This could be used for example when calculating formwork for footings. See more details from the Calculate Quantities Tools documentation.
Area Top Gross and Area Top Net
The total area of all the upward-pointing surfaces of the object.
The gross area does not take into account the openings. The net area does.
Area Total Gross and Area Total Net
The area of all the surfaces in the object’s geometry.
The total gross area is the area of all the surfaces of the object’s geometry, not taking into account the openings and surfaces within the openings.
The total net area is the area of all the surfaces of the object’s geometry you can see in 3D.
Calculate Quantities: Dimensions
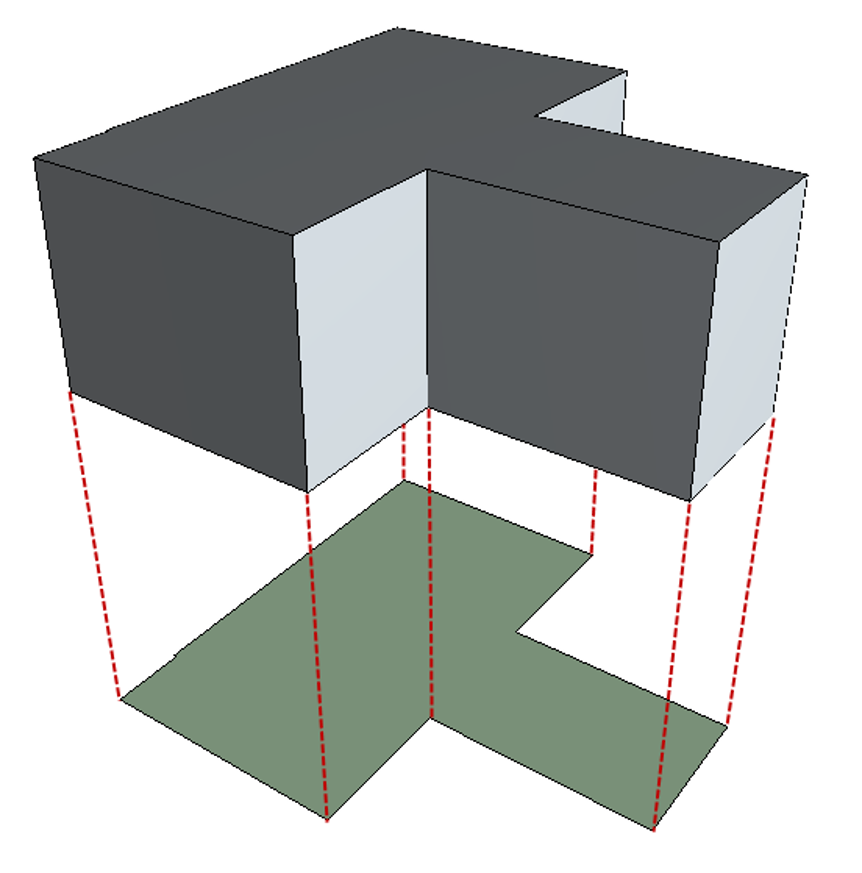
All the dimensions are calculated based on the so-called smallest box of the object. This means that all the objects have three different dimensions.
The three main dimensions of an object can be calculated with different logic. In order to handle as many situations as possible, there are two different logics for calculating them. Both logic has three different dimensions. You can mix the dimensions calculated with the different logic but note then that in some cases, they can calculate the same thing. For example, the Height of a vertical column might be the same as its the Longest dimension. Then again Height for a pad footing would probably not be the same as the Longest dimension.
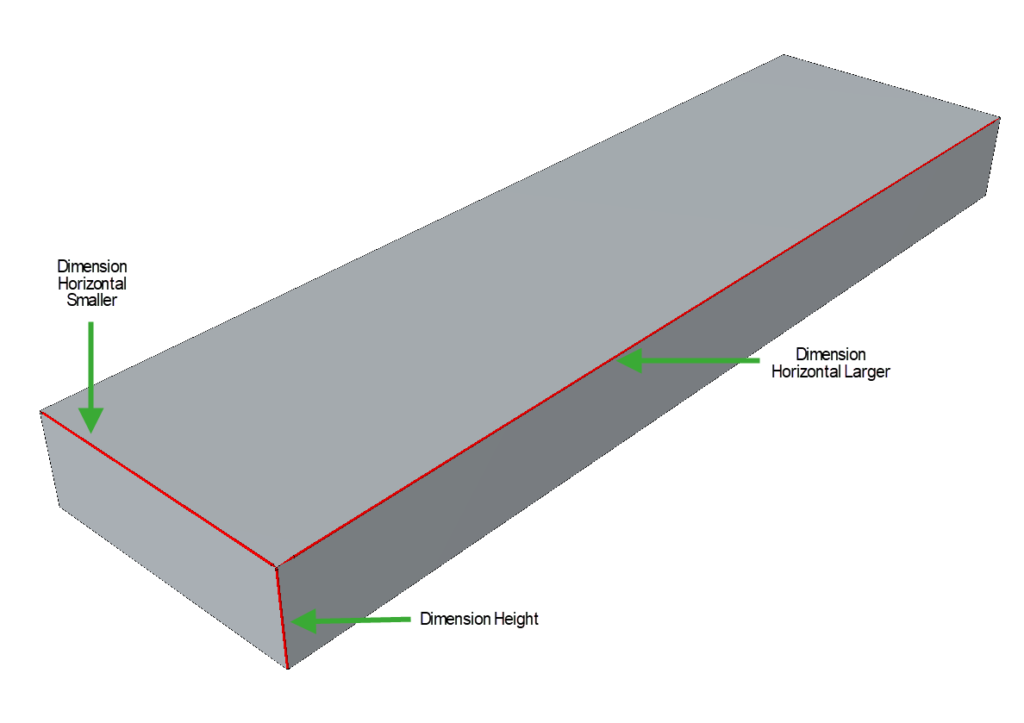
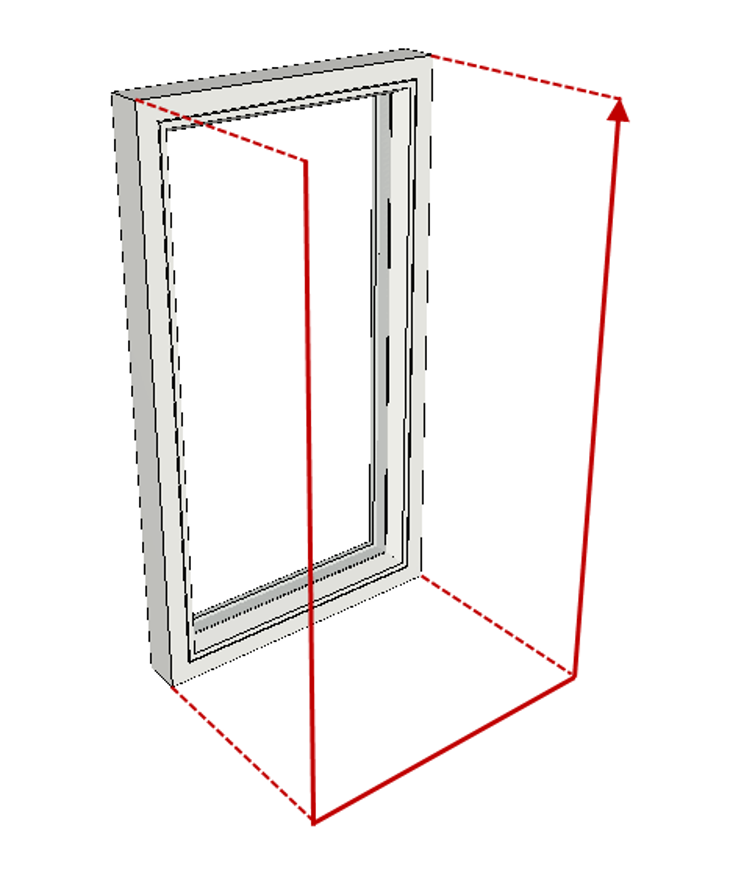
Height
The vertical dimension of the object. Note the height is not the object’s vertical dimension in its world coordinate position. The height is the most upward dimension of the object. The picture will explain this better than words.
Note that the dimensions are based on the smallest bounding box. So if for example your gable roof is modeled from one piece, then height is the vertical dimension of the whole thing.
If you need to include all three main dimensions in your quantities, use Height together with the Horizontal Longest and Horizontal Shortest.
Horizontal Longest
The larger of the object’s horizontal dimensions.
If you need to include all three main dimensions in your quantities, use Horizontal Longest together with Height and Horizontal Shortest.
Horizontal Shortest
The smaller of the object’s horizontal dimensions.
If you need to include all three main dimensions in your quantities, use Horizontal Shortest together with Height and Horizontal Longest.
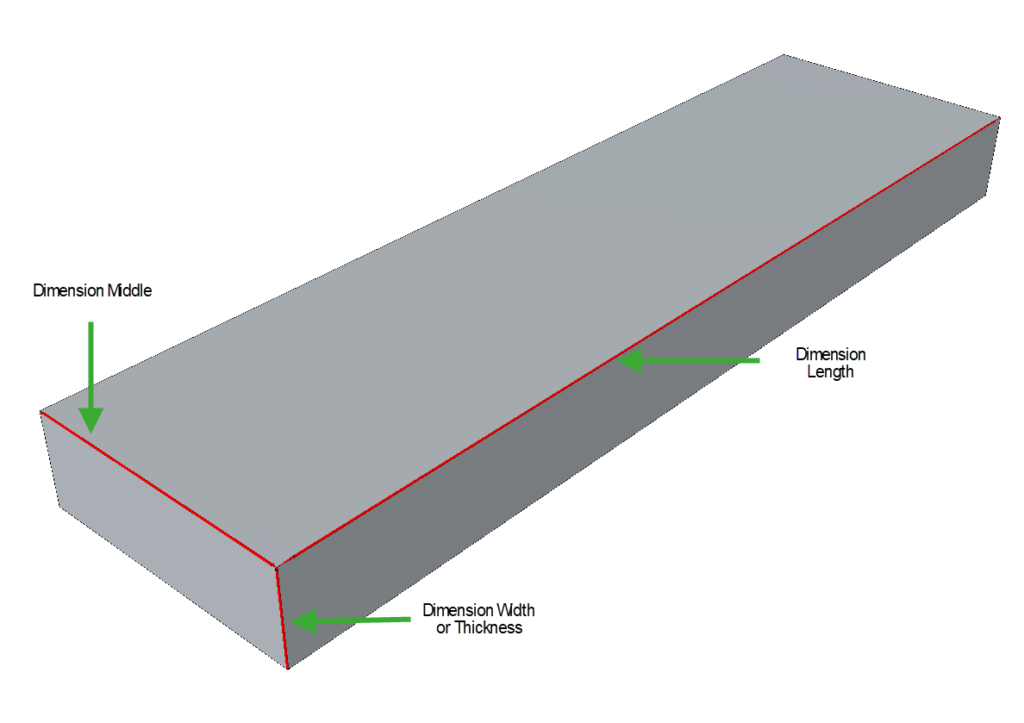
Longest
The longest dimension of the object. Usually you would use this as the Length of the object. Unless you are calculating the wall lengths. Then you probably want to use the Horizontal Longest.
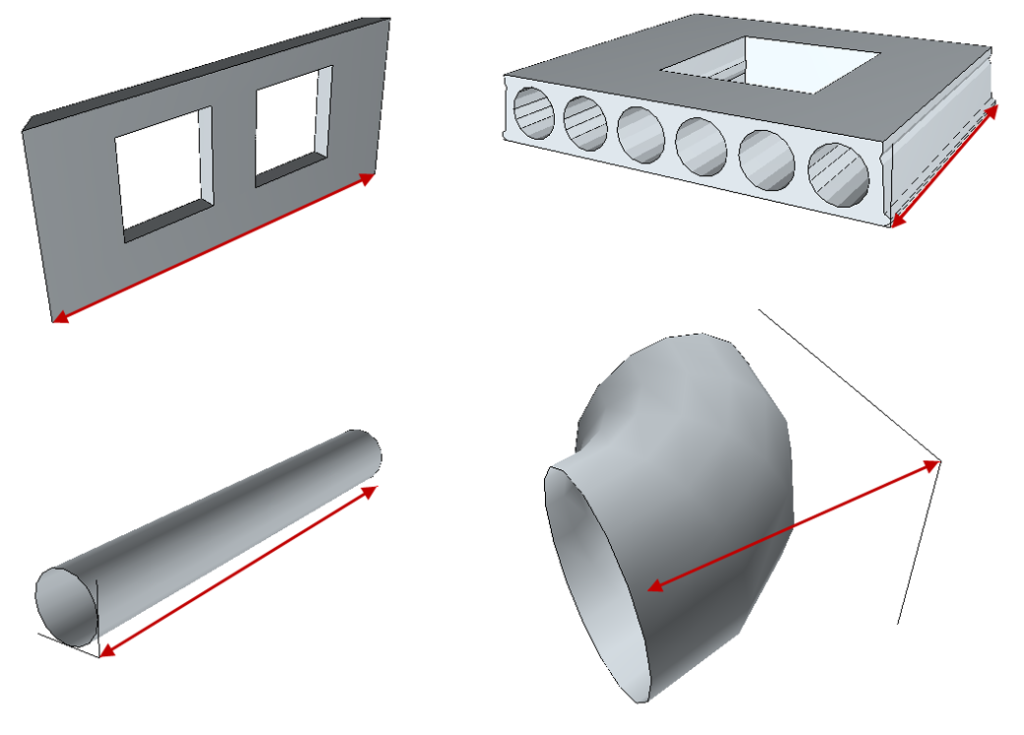
If you need to include all three main dimensions in your quantities, use Longest together with the Middle and Shortest.
Middle
The middle dimension of the object. In other words, not the Longest or Shortest of the three main dimensions.
If you need to include all three main dimensions in your quantities, use Middle together with the Longest and Shortest.
Shortest
The shortest dimension of the object. Usually you would use this as the width or thickness of the object.
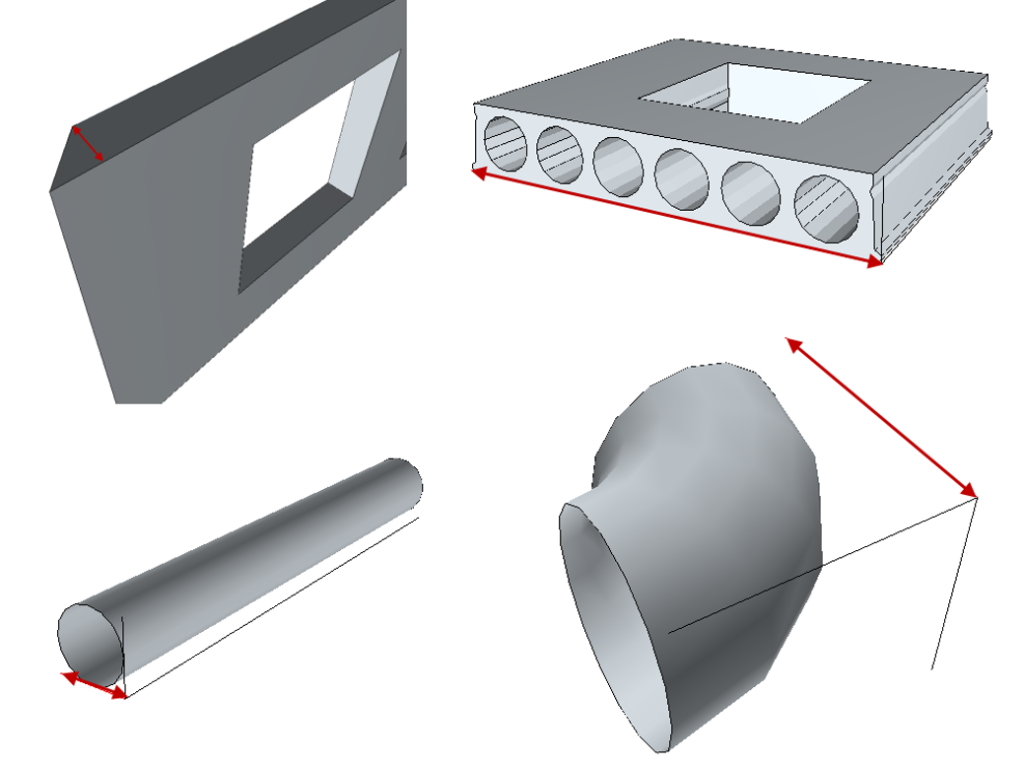
If you need to include all three main dimensions in your quantities, use Shortest together with the Longest and Middle.
Frame
This is a derived measure for your convenience. It is calculated with the formula: 2 * Height + Shortest/Middle.
Calculate Quantities: Space Surfaces
Area Sides Net
Areas of the bounding elements projected to the space object’s side surfaces.
The Area Sides Net takes into account the openings in the bounding objects. Note that if you need the actual opening area for the space surface, then use the Area Opening Element.
If you create derived objects for space-side areas, then the geometry represents the intersection of the space surface and the bounding elements.
Area Top Net
Areas of the bounding elements projected to the space object’s top surfaces.
Area Bottom Net
Areas of the bounding elements projected to the space object’s Bottom surfaces.
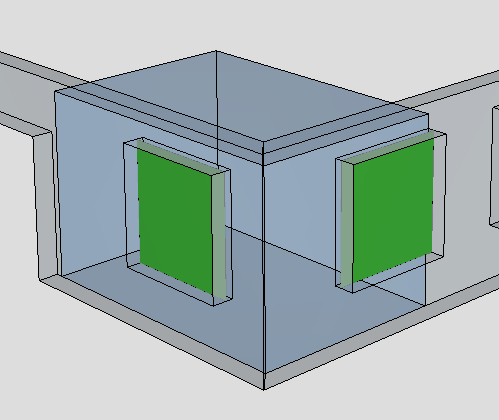
Area Opening Element
Areas of the openings in the bounding elements, projected to the space object’s surfaces.
Calculate Quantities: Openings
Opening elements are a special feature in BIM models. Usually they are not explicitly visible in the viewers. Same applies to Simplebim. However they are there, and they can be used for quantity calculation. Note that the opening quantities can be only calculated, if the actual objects are in the model. This depends on how the model is created in the model author tool.
Area Opening Element
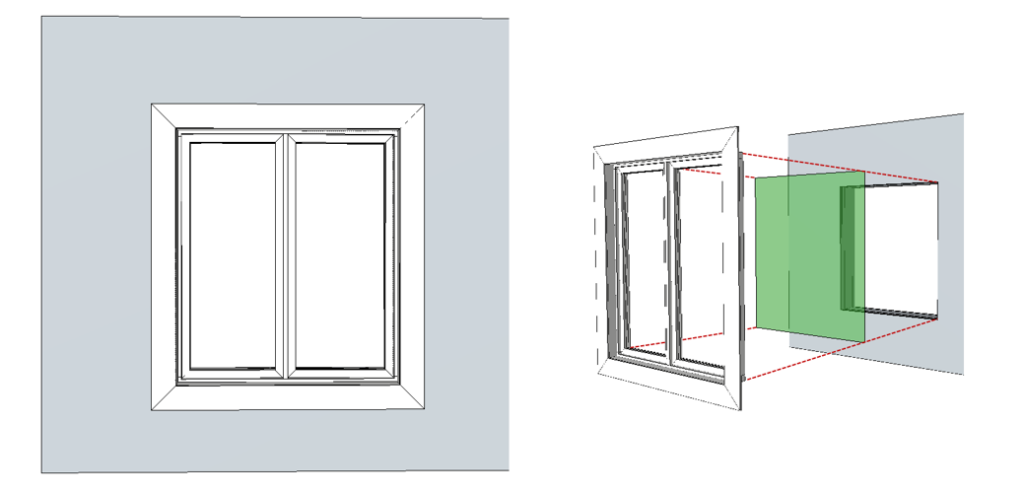
The area of an opening element that is related to for example window or door. Note this can be different from the area of the actual product within the opening, for example, a window or door.
If you want to calculate the area of a window or door, use the Area Shadow Net instead. Which one you choose depends on whether you need to take into account the mounting allowance or not. Area Shadow does not take into account the mounting allowance. Area Opening Element does. Note whether or not these two are different, depends on how the model is created by the designer. Whether the designer has modeled the mounting allowance or not.
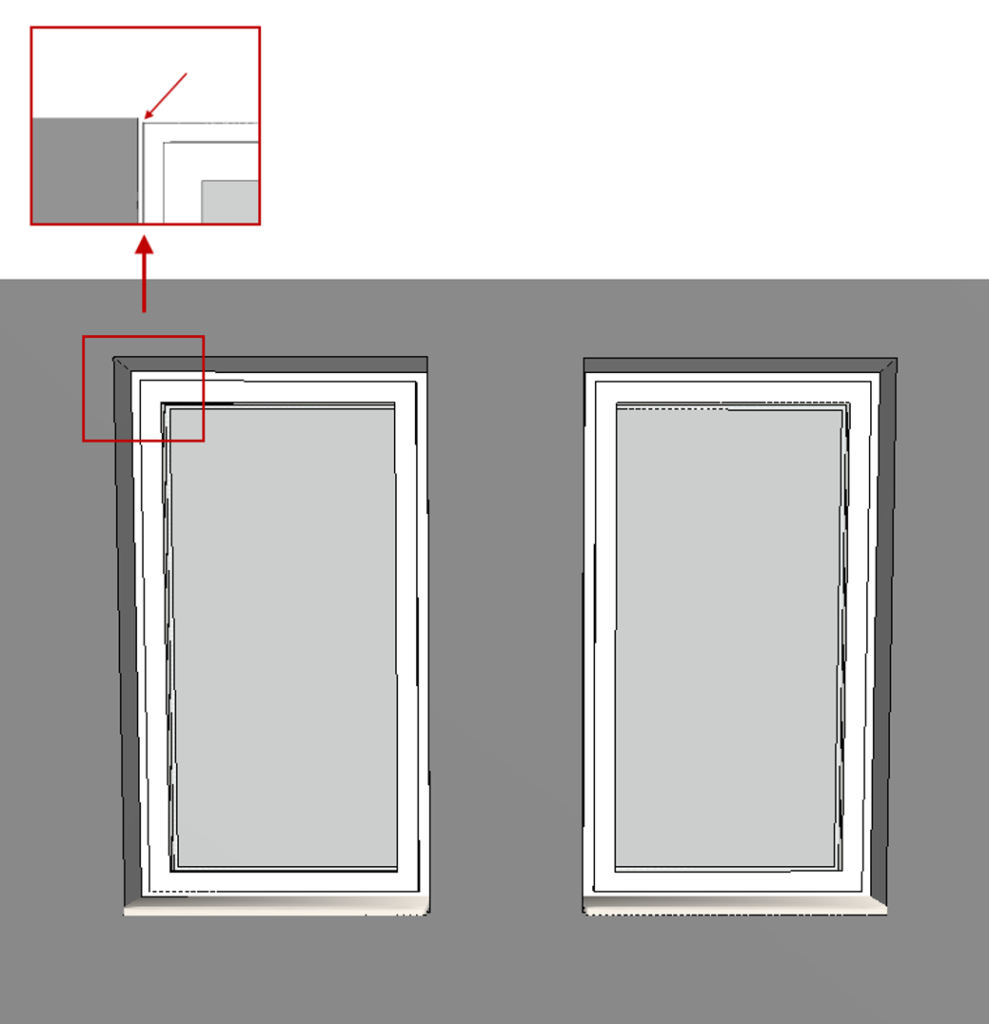
Height Opening
So-called fills, for example, doors and windows, have two different heights. One for the opening and one for the actual fill (product). To measure the fill height, use Height dimension. To measure the opening height, use Height Opening.
Whether these two are different depends on how the model is created. If the opening is modeled with the so-called mounting allowance, then these two dimensions are different. In this case, you can choose the one you need for your QTO.
Width Opening
So-called fills, for example, doors and windows, have two different widths. One for the opening and one for the actual fill (product). To measure the fill width, use Shortest dimension. To measure the opening width, use Width Opening.
Whether these two are different depends on how the model is created. If the opening is modeled with the so-called mounting allowance, then these two dimensions are different. In this case, you can choose the one you need for your QTO.
Frame Opening
This is a derived measure for your convenience. It is calculated with the formula: 2 * Height Opening + Width Opening.
The Frame Opening is only calculated for the fills, like doors and windows.
Perimeter Opening
This is a derived measure for your convenience. It is calculated with the formula: 2 * Height Opening + 2 * Width Opening.
Note to measure the fill (door or window) perimeter, use the Perimeter Shadow Outer.