07. Define Locations
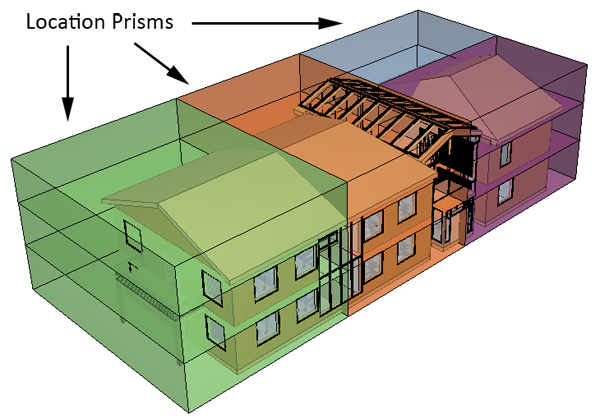
In construction everything happens in a location and this is why it is very useful to have location information in your models. A location is about the physical location of an object and the location itself can be described by a 3D prism. If we for example have a 3D prism that represents ‘Section A’, then the location of all objects inside that 3D prism is ‘Section A’. Simple.
A single model may have multiple ‘location systems’, for example…
- Construction sections
- Concrete pours
- Apartments
- Spaces
- Building storeys
- Takt areas
Each object can be located in only one location within a given location system, but it can of course be located in several location systems. A wall can for example be located both in ‘Section A’ and ‘1st Floor’, but not on ‘1st Floor’ and ‘2nd Floor’. Simplebim supports up to 10 simultaneous location systems.
Defining locations in Simplebim involves these 3 steps.
- Defining the locations: location prisms and location properties
- Resolving the location of objects
- Using the location information
You can test the instructions in this article with the Getting Started model that is installed with Simplebim into the Getting Started sub-folder of the Simplebim installation folder. The same folder contains also two location prisms models, one with final location prisms and another with location prism footprints.
The tutorials in the serie Simplebim® – Location Prism and this example show you how to create and manipulate location prisms.
Defining locations
Defining locations starts by opening the Location Editor workspace and enabling the Location Tools.

In order to define locations you must have 3D location prisms. The location prisms are 3D objects that can have any shape, i.e. they are not limited to ‘shoe boxes’. There are multiple ways in which you can get location prisms into your model
- Import: you can import the geometries of location prisms from a separate IFC file. Any IfcSpace or IfcBuildingElementProxy objects of the imported model are used as location prisms. You can import location prisms as they are or have Simplebim generate location prisms for each building or building storey from the footprints of the imported prisms.
- Create: you can create location prisms from the building storeys that you already have in your model or from clipping planes you have added to the 3D window.
- Model: you can model new location prisms in Simplebim. The prisms you initially model have quite simple geometry, but you can add and subtract geometries from any objects, including other location prisms, from the prisms you model.
- Re-use: you can use any 3D objects you already have in your model as location prisms. You can for example use the space objects in your model as locations for furniture and HVAC elements.

You can also modify, copy and move already existing location prisms.
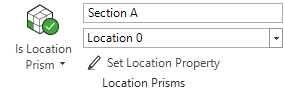
Once you have your location prisms, you need to set the location property. When you initialize the Location Tools in Simplebim the properties ‘Location 0’ to ‘Location 9’ are added to all objects. You need to decide how you use these location properties, which essentially each represents one location system. You can for example decide that ‘Location 0’ means section and ‘Location 1’ means building storey. For your location prisms describing ‘Section A’ you would then set the value of the ‘Location 0’ property to ‘Section A’.
Resolving locations
When the locations are resolved Simplebim scans the location prisms and finds the objects that are inside each prism. It then copies the location properties from the prism to the objects inside the prism. When Simplebim for example finds that a wall is inside the location prism describing a section, it copies (in our example) the value of ‘Location 0’ of the prism to ‘Location 0’ of the wall. Thus the ‘Location 0’ property of our wall will get the value ‘Section A’, which tells us that this wall is located in section A.
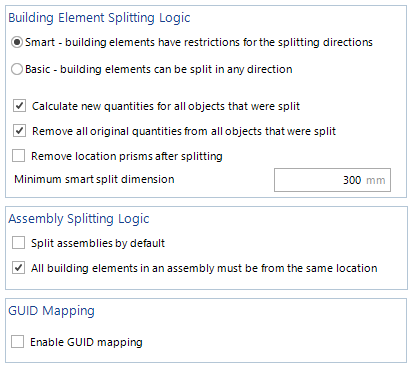
You can use two modes when resolving locations
- Resolve only: if an object is located inside multiple location prisms, for example a slab in multiple concrete pours, the object is assigned to the location where it’s volume is the greatest.
- Resolve and split: if an object is located inside multiple location prisms it is cut at the border and as a result there will be a piece of the original object in each of the locations. This behavior can be controlled in multiple ways.
- You can define objects that will never be split, such as doors and windows. Those objects will follow the ‘resolve only’ logic
- Smart split allows for some tolerance in the location prisms by preventing the creation of small parts or splitting building elements in the wrong way.
- You can control how assemblies are split, for example if an assembly can have parts in multiple locations.
- You can use GUID mapping, which ensures that the parts created by splitting get the same GUIDs the next time you split a new version of the same model with the same prisms.
Using location information
Once you have resolved the locations you have the location information in the properties ‘Location 0’ to ‘Location 9’. This is probably not what you want.
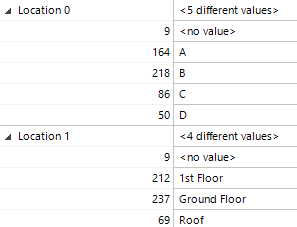
The most typical case is to copy the values from those properties into your own properties. Let’s say you have your own property set with a property called ‘Section’ and after splitting you have your section information in ‘Location 0’. In this case you would simply copy the values from ‘Location 0’ to ‘Section’.
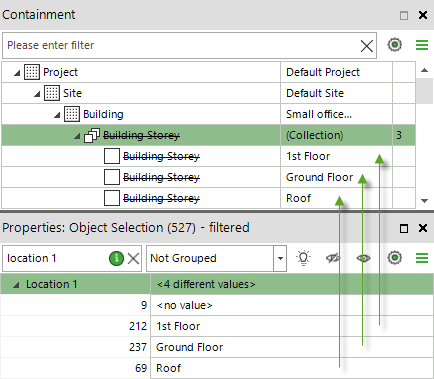
A special case is to convert the building storey location information into the IFC containment structure. For this you need to take the following steps in the Containment palette
- Drag&drop all objects that belong to a building on top of that building in the Containment palette. This will change the containment such that all objects are contained directly by that building.
- Select the building. This will select all objects in the building in the Properties palette
- Expand the location property you used for building storeys, for example ‘Location 1’
- Drag&drop each value one by one on top of the corresponding building storey in the Containment palette.
Automatic locations
Using location prisms for defining locations can also be automated using Simplebim scripts. A simple script for defining locations would look something like this.
Import=MyModel.ifc
Merge=MyPrisms.ifc|MERGE_TYPE=READLOCATIONPRISMS
Run=Split Geometries
Export=MyModelWithLocations.ifc
Close