Trim the Model
Trimming the model means removing anything that you don’t need from the model. You may want to trim models before you share them with others to make sure all the data you share is relevant and reliable. Or you may trim models you receive from others as part of normalizing the models for your internal use. Normalization makes sure the users in your own organization get the maximum benefits out of BIM without being confronted with technical issues. This makes it possible for people who are not BIM experts to use BIM effectively.
You can trim the model manually from the Simplebim user interface or automate trimming using templates and tools. Templates can also be applied from scripts to further automate the process.
In addition to data export, trimming also affects what you see in Simplebim. Anything that you exclude is hidden in all other workspaces than the Model Trimmer workspace. For example the 3D tooltips show only included properties. Validation also targets only included objects and properties. Anything that is excluded is not validated, because that data does not matter to you.
Manual trimming
Trimming objects
Trimming objects happens by assigning a selection of objects into one of these categories
- Included: These objects are always exported from Simplebim
- Excluded: These objects are never exported from Simplebim
- Not Decided Yet: Initially all objects are in this category and will be exported from Simplebim. But as soon as you put even one object in the Included category, then the objects in the Not Decided Yet category will not be exported from Simplebim.
When you trim objects you can use one of two basic approaches
- Include only the objects you need
- You put all objects you want to include into the Included category
- Exclude all the objects you don’t need
- You keep all objects you want to include in the Not Decided Yet category
- You put all the objects you want to exclude into the Excluded category
- You keep the Included category empty
Our recommendation is to use the first approach because it is better for improving your trimming over time. This is because it is easy to notice if you trim objects that are actually needed. But if you leave unnecessary objects in the model, then these can easily go unnoticed, until they some day cause you unnecessary problems.
The actual trimming is easy: you first create a selection of objects and then drag&drop the selection to the appropriate ‘bucket’ in the 3D window.
Trimming properties
Trimming properties is even more straight forward than trimming objects. Properties can only be either included or excluded. You make these decisions in the Properties palette.
For trimming properties the content of the properties palette must be objects from a single object class. This is because properties are included/excluded per object class. It is not possible for example to include properties only for some walls and not for other walls.
All objects of the same object class have the same properties. However, you can hide all empty properties in the Properties palette, which will hide all unnecessary properties for the individual objects. Simplebim also does not export empty properties to IFC, which means that these unnecessary properties do not exist in the exported IFC either. You can think of it like this: In Simplebim all objects from the same object class have the possibility to have the same properties, but if you leave the property empty for an individual object, this actually means that the property is excluded from that object.
If you do want to export empty properties from Simplebim you must give them some placeholder value like ‘N/A’
In the Properties palette you can include/exclude all properties. Here you basically make the decision if you want to ‘clean the table’ and start including back the properties you really need, or if you want to start excluding the properties you don’t need. We recommend cleaning the table first because of the same reasons we gave for objects above.
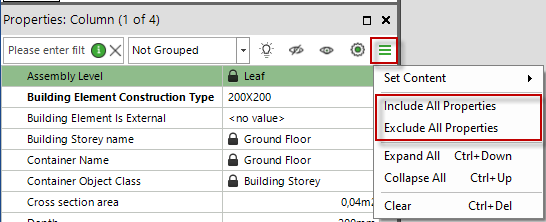
When you exclude a property the name of the property will be displayed with the strike through font.
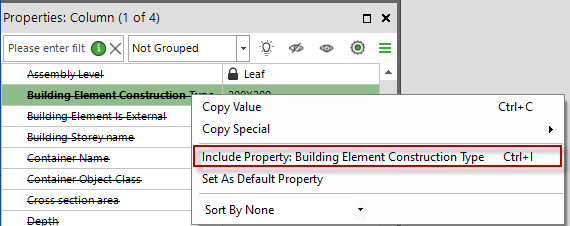
You can then include/exclude individual properties or a selection of properties via the right-click menu. If you group the Properties palette by Property Set you can include/exclude all properties in a property set by selecting a Property Set and using the right-click menu.
When you exclude a property from a Property Set or Quantity Set, then this property will not be written to IFC.
When you exclude an optional property that is hard-coded in the IFC schema, the property value will not be exported.
When you exclude a mandatory property that is hard-coded in the IFC schema, then an empty value will be written to IFC.
When you exclude a locked property, the property is actually not excluded. This is because locked properties are derived information. For example if you exclude the ‘Building Storey Name’ property, which shows the name of the building storey the object is located on, this will not remove that object from its building storey.
Trimming groups, type objects and classifications
The models often contain groups, type objects and classifications that are not needed or contain unreliable information. These are often exported automatically to IFC by the model authoring applications. Groups, type objects and classifications are all shown in the Objects palette and handled in an identical way.
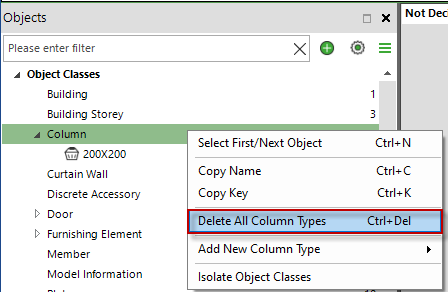
When you select an object class or group category, you find the option to delete all type objects / groups from the right-click menu. When you select a single item or a multiple items you find the option to delete those in the right-click menu.
Special trimming
There are several trimming options in the IFC export settings
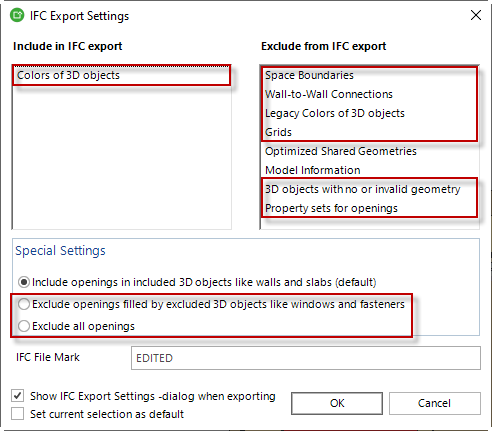
- Excluding colors of 3D objects will export the IFC model without any color information
- Legacy colors for 3D objects should always be excluded, unless you are using for example a very old version of Navisworks
- Space boundaries are used for energy analysis and should be excluded unless you know you need them
- Wall-to-wall connections you can usually exclude unless you need more precise wall connections in your application. You can experiment with this setting, but often excluding the connections actually gives a better result.
- Grids you can include/exclude based on your needs
- You may want to export 3D objects with no or invalid geometry if some objects are not visible in Simplebim. There is a chance that they will be passed through Simplebim as-is even if Simplebim is not able to display them.
- Property sets for openings you can include if you need them
- Excluding openings with excluded fillers is good option when you trim for example structural steel models. Excluding for example bolts makes the model lighter, but also excluding the openings of those bolts can have a even bigger effect.
- Excluding all openings can be useful for example for minimizing the model sizes for structural steel models.
Automated trimming
The following instructions are for automating trimming with templates. There are also several tools in the Prototypes add-on for trimming groups, type objects and classifications and for deleting materials.
Step 1 – Decide which object classes you need
| Worksheet | Section |
|---|---|
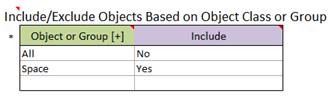
| ModelView | Include/Exclude Objects Based on Object Class or Group |
Here you can define which Object Classes are relevant to your use case. It is a good approach to first exclude all Object Classes and then start including only the ones you need.
Step 2 – Decide which object instances you need
| Worksheets | Sections |
|---|---|
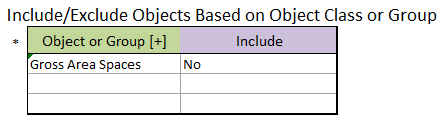
| Groups Worksheet Model View Worksheet | Define Groups Based on Property Values -section Include/Exclude Objects Based on Object Class or Group |
You can include and exclude individual objects (Object Instances) by defining object groups and including/excluding the groups.
First you define a group that contains a set of objects, for example all spaces with a Space Name that starts with ‘Gross’. The name of this group could be for example ‘Gross Area Spaces’. Please note that you can also create groups that use numeric and Yes/No operators as well as And/Or logic. You can find more information about groups here.

Then you simply include/exclude the group just like you would include/exclude an object class.
Step 3 – Decide which properties you need
| Worksheet | Section |
|---|---|
| ModelView | Include/Exclude Property |
Here you can define which properties are relevant to your use case. Again, it is a good approach to first exclude all properties for all Object Classes and then start including only the ones you need.
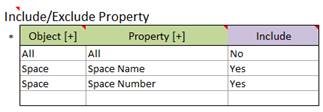
You can also Include Properties by Property Set.