Calculate Properties Tools
Calculate Properties tools calculate property values based on formulas, and thus derive new data into the model based on existing properties. There are altogether three different Calculate Properties tool, each for different kinds of calculations.
| Calculate Properties for Objects | Calculates new properties for building elements |
| Calculate Properties for Groups | Aggregates property values to the group object itself from the objects the group contains. |
| Calculate Properties for Containers | Aggregates property values to the container object itself from the objects the container contains. |
| Calculate Properties for Connected Objects (beta) | Calculates and aggregates property values to the objects which are connected with a connection property. |
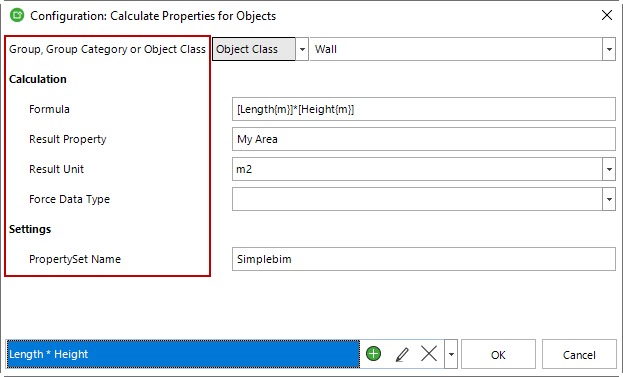
Calculate Properties for Objects
Calculates new properties for building element objects. The formula can use constants, building element’s own properties or even group properties, if the object is assigned to a group, which you set as a target of your calculations.
Calculate Properties for Groups
Aggregates property values to the group object itself from the objects the group contains. The formulas can use constants, group’s properties and of course building element objects’ properties. The very basic operation is summarizing property values in different ways, but there are other aggregation types available too.
In Simplebim systems, zones, classifications and type objects are also groups.
Calculate Properties for Containers
This is similar to the for Groups tool. In this case the aggregation is done to so called containers. Typically the containers are assemblies of different kind. For example a structural precast object.
Calculate Properties for Connected Objects (beta)
Calculates and aggregates new properties for building element objects which are connected together. The connection can be created for example with the Proximity Tool. The formula can use constants, building element’s own properties or even properties from the connected objects.
Common Configurations
All three tools have some common configurations and some are specific for each. Let’s first go through the common ones.
Defining the source (Name of Group, Group Category or Object Class)
The tool takes in either a group, category of groups or object classes. These define the objects that are used in the calculation.
The group or category is defined in the dialog. The drop downs show the groups, group categories and object classes found in the model. Optionally you can type the group, group category or object class name or key. This makes sense when you are creating generic calculation rules, which can be applied to many different models.
Defining the formula
This is where the magic happens.
In general, the tools support most of the standard Excel-functions. If you can use your formula in Excel, you should be able to use it here. With some limitations of course.
You can use basic math and trigonometric functions. These include +, -, * and /. But also functions like ABS(), SIN(), and POWER().
Unlike Excel we DON’T use the = prefix in the formula.
Few important formatting guidelines. Constant text is placed inside quotes (“Your text”). For constant numbers, you can use local decimal delimiters (, or . depending on your locale). Don’t use thousands separators. In formulas, use ; as parameter separator. For example IF(something;then this;otherwise this)
Note that aggregating calculations like SUM are done with the help of the aggregation types, not directly in the formulas. The formula you define is always applied to one object at a time.
For dates and times you can use functions like TODAY(), NOW(), WEEK(), YEAR(), HOUR(), DATEADD() and DATEDIFF().
Finally, you can use logic in your formulas. Comparing items with <,>,<=,>= and = or <>. Or even IF functions. The formulas support even nested IF functions. More about them in the examples.
In the formula, you can use different kinds of items:
Constant Values
This can be a whole or decimal number like 2000 or 2000,00. Use the delimiters of your own local. For example ‘,’ in Finland and ‘.’ in US.
Text constants are placed inside quotes. For example: “My text”.
Constant date values are explicitly defined by the DATAVALUE function. For example: DATAVALUE(“2/3/2023”). Note that constant dates must be given in this format: mm/dd/yyyy.
Constants for boolean values are TRUE and FALSE.
Function Formating
Use the semicolon character ‘;’ to separate multiple parameters. For example:
IF([Width]>=10000; “Special Object”; “Normal”)
Object Property Values
Object properties are represented in the formulas in a specific format. The name or key of the property must be surrounded by brackets. For example, ‘Net Volume’ should be written as [Net Volume] in the formula.
You can use properties of any data type in your formulas. Just make sure, that the formula makes sense. For example, you cannot multiply a number by a text.
Group Property Values
If your input to the tool is either Group or Group Category, then in addition to object properties, you can use group properties in your calculations. Say for example that you have set the workload multiplier to your groups, and you want to calculate the actual workload for each object within the group.
The group properties must be represented in a specific format. First of all, they too must be within brackets. Also, they need to be separated from object properties with the Group| -prefix. Your formula would then look something like this:
[Group|My Workload]*[Net Volume]
You can use group properties of any data type in your formulas. Just make sure the formula makes sense.
Container Property Values
If you are using the Calculate Properties for Containers or the Calculate Properties for Connected Objects tool, then in addition to object properties you can use container properties in your formulas. This works the same way as the group properties. However the format for the container properties is as follows: [Parent|My Workload].
Defining the units
One of the great things about IFC models is that they know, which units they are using. Then again not all the IFC models are in the same units. Because of this, extra care needs to be taken in the calculation, so that your end result is correct. For example, it probably doesn’t make sense to multiply values in mm with values in m. When calculating values in derived units, this gets even more complicated. If your density is in kg/m3, then you must make sure that your volume is in m3.
Luckily enough these challenges can be handled in the formulas by defining the units. The unit is defined within in curly brackets. For example {mm}. The unit for an object or group property must be defined within the brackets. For example [Net Volume {m3}].
This way your model can be in any unit, and the calculator will automatically convert the values to your chosen unit before doing the actual calculation.
Note that only basic units are supported. You can see the supported units from the Result Unit drop down.
Finally make sure that your result units is inline with your unit definitions in the formulas. If you are multiplying millimeters, but set the result unit to meters, then you will get too big numbers as result.
Defining the Result Property
The result property is the name or key of the property, to which the calculation result will be set. This can be the property of an object, a group, or a container, depending on the tool you use.
If you already have a property with this name or key defined in the model, then that one is used. The existing property will also define the datatype and in the case of measure values the unit of the result. Conversions are done automatically if needed. Note that not all conversions are possible. For example, the calculator cannot convert a text result to a number if the text contains alphabetic.
If the property with the given name or key does not exist in the model, then a new property is automatically created. The property is created with the given name. The data type is defined by the calculation result, or if you have explicitly defined a result unit, then the result property is created as a measure value property of that unit.
Beware of existing properties!
The tool will not re-define existing properties. If a property with the same name already exists, then the existing property will be used as-is. For example if there is an existing property with the name ‘Net Area’ with the data type ‘Number’, and you try to define a new property ‘Net Area’ with the data type ‘Area Measure‘, then the data type of the property ‘Net Area’ will remain ‘Number’.
Defining the Result Unit
When we talk about enriching BIM data we are most of the time talking about calculating measure units. Lengths, areas, volumes, weights, time, cost…
Because the formula can be basically anything, the system cannot reliably guess the unit you are aiming for. This is why whenever you are calculating measure values, you should explicitly define the resulting unit. This way the tool is able to create the right kind of property for your result and convert the result back to model units in the right way. Just make sure that the units you are using in your formula is in line with the result unit.
Note that there are different unit symbols for length, area, and volume units.
Forcing the Result Data Type
Usually, you can leave this parameter to its default . However, whenever you want to force the end result to a number, text, or boolean value, you should use this. This comes in handy when you are for example multiplying measure values in your formula, but there’s no result unit in Simplebim/IFC that you would want to use. You can then save the result as a number, and it is then your and the user’s responsibility to know, what units that number represents. Or you could for example make a calculation, but want to save the result as text.
Property Set Name
The property set name is used, when the tool automatically creates your result property. This happens, when the tool cannot find the Result Property from the model. This is not a mistake. It is actually very convenient to let the tool create the properties. This way you can skip the extra step of adding the property separately to the model. However, in order for Simplebim to export the Result Property to IFC, it needs to know, which property set it belongs to. This is just how IFC works. Use the Property Set Name to define the property set. This can be basically anything. Probably some property set of your own. The one your company uses, or some BIM exchange requirement has defined.
Additional configurations: Calculate Properties for Groups, Containers and Connected Objects
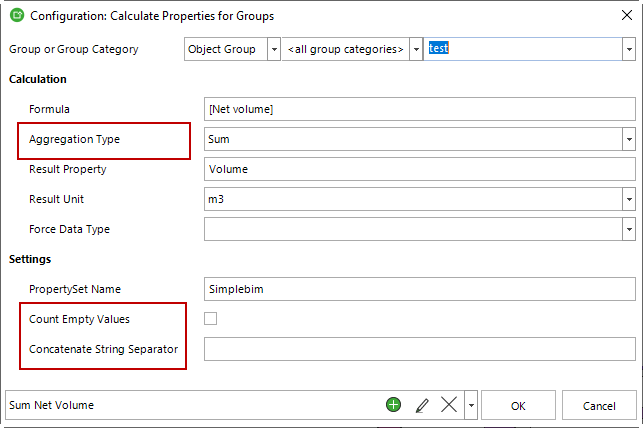
Choosing the aggregation type
This option applies when your using either the for Groups, for Containers or for Connected Objects tool.
For example, if you would want to calculate the sum of the object volumes from the objects assigned to the group, you would choose SUM here.
The options here are sum, average, min, max, median, variance, object count, concat.
The basic aggregation types do what their name says. Note that you can calculate Sum, Average, Median, and Variance based on a formula, which produces a numeric result.
Min and Max can be found for any numeric result, but also for dates and times. You could for example find the largest volume from all the objects included in the group. Or you could find the latest or earliest date.
For Object Count, your formula must be logical. For example [Height]>3000. This would calculate the number of objects within the group, which height is greater than 3000 (in model length units).
For Concatenate String the formula can be anything, however, the end result is always converted to text. The values included in the concatenated result will be the unique set of values from all the values calculated based on the formula, instead of including all the values.
Note that the Calculate Properties for Connected Objects has two additional options: Objects and Has Objects. Objects sets the values to the building elements referenced by the Connection Property. Has Objects calculates a Yes/No (boolean) value to the parent based on the formula. If one or more objects referenced by the Connection Property meets the requirement set by the formula, then this operation returns Yes (true). An empty formula checks if the connection references any building elements.
Count Empty Values
This setting applies when you are aggregating values. It might be that not all the objects within your groups have a proper value for the properties you use in your aggregation. Say there are objects, which volume is for some reason zero, and you want to calculate the average of the volumes. Do you want to include the zero values in your average? Or when finding the minimum value, do you want the non-zero minimum or zero? Set this parameter accordingly.
Concatenate String Separator
This setting applies when you are using the Concatenate String aggregation type. In order to make sense of the result, the value needs to be separated with some separator. This can be anything. A space, hyphen, colon, or semicolon are probably the most common ones. For example if you would combine the material names and used hyphen as your separator, the end result would look something like this:
Concrete-Steel-Timber
Connecting Property
Connecting Property is used in the Calculate Properties for Connected Objects. This defines the connection (reference) property the tool should follow, when doing its calculations. If you use for example the Proximity tool for creating the connection, then Connection Property should match the name you used for the Connection Property in the Proximity tool.
Example Formulas
Here are some common examples you to get started. Note that in order to apply these to your models, you of course need to adjust the values and property names accordingly.
Calculate Properties for Objects
For all these, you need to use the for Objects tool.
The very basic formula is to set a constant for all the objects assigned to the given groups. This can be a number or string or date. Simply write the constant to the formula:
1000 or 0,5 or “My constant text” or DATEVALUE(03/18/2023)
Next, you could for example multiply some measure value with a constant. This could be for example a density times volume. In my example my density is defined in m3/kg:
7250*[Volume{m3}]
Next, you could multiply, divide add or subtract property values from each other. For example:
[Length]*[Height]
Or you could combine text together something like this:
[Building Element Construction Type] & [Height] & “-” & [Width]
For the next one, you have to have some meaningful group properties defined. Say you have the workload multiplier defined in the group property and you want to multiply the volume of the objects with it.
[Group|Workload]*[Volume]
How about the date operations? Let’s compare the current date to the one defined in the object properties and set a Boolean value indicating whether the object is late or early.
[My Date]<TODAY()
Now it gets interesting. What if I want to include some logic in my calculations? Let’s say I want to set a string value based on some calculation. Note the items in the IF function are separated with semicolons.
IF([Group|My Group Prop]*[Width]>=1000; “Special Object”; “Normal”)
Now let’s go nuts and use nested IF functions. Let’s choose the measure value to multiply based on another property:
IF([Measure Type]=”rm”; [Length][My Multiplier];IF([Measure Type]=”m3″; [Net Volume][My Multiplier];IF([Measure Type]=”m2″; [Area]*[My Multiplier];0)))
Calculate Properties for Groups or Containers
For all these examples, you need to use either the for Groups or for Containers tool.
The very basic function is to summarize the values produced by the formula. So, it can be sum of just one object property. Set the aggregation type to SUM and input the formula:
[Volume]
Or it could be sum of some calculation like for example weight:
7250*[Volume]
You can find the minimum or maximum value from any measure value property, or calculation result. Just like above, this would find for example the minimum area. Set the aggregation type to MIN and input the formula:
[Area]
… Or you can use any formula, which produces numeric values:
[Group|Workload]*[Volume]
To Concatenate a string from the object properties to the group use something like this. Remember to set the Concatenate String Separator:
[Material]
You can even combine the object identifiers with the Groups own if that makes sense:
[Group|Name] & “-” & [Building Element Construction Type]
And what is cool, the properties you include to the concatenated string don’t even have to be text properties themselves:
[Building Element Construction Type] & “-” & [Height] & “*” & [Width]
Final thoughts
There you go. Calculate Properties tools are not a children’s toy, but you can do magical things with them! Remember that the designer’s model is just the starting point. Just like when using documents, you need to enrich the design data further in order to use it in the other functions. Whether it is cost estimating, procurement, tendering, production planning, scheduling, logistics, or something else.
Using Calculate Property tool gets even more powerful if you have first standardized and normalized the models. This is also what Simplebim can do for you. This way you could use the same formulas for all of your models and in every project.
Please let us know if you figure out some valuable, new way to use this tool, or of course if you run into any issues. Math is always dependable! Happy calculating.