Create Space Covering Objects
This page may include version-specific information that is no longer current.
The warning is added automatically and may appear on pages containing version-neutral or up-to-date information.
This tool creates new space covering objects based on the geometry of the space objects in the model. These covering objects are useful for quantity take-off, 4D simulations and many other use cases.

Creating covering objects
The logic of this tool is as follows:
- The tool iterates all included space objects.
- If you don’t want to create covering objects for some spaces (like net and gross areas) you should exclude those spaces before running this tool.
- For each space the tool iterates all sides of the space geometry
- For each side the tool tries to find adjacent building elements or other spaces.
- If it finds an adjacent element it creates a covering object between the space and the element.
- For any sides (or parts of sides) for which it is not possible to find an adjacent element a covering object without an adjacent element is created.
- No covering objects are created for doors, windows and empty openings.
Using covering objects
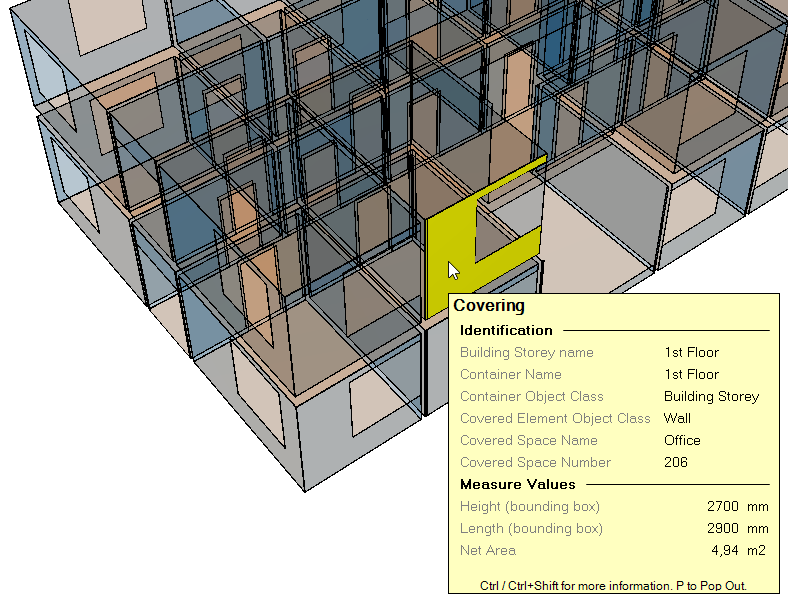
After the tool in run the newly created covering objects are shown in the Objects palette under Covering. The covering objects are 3D objects, just like all other objects. You visualize them in the 3D window and see their properties in the Properties palette. Each covering gets the following properties:
- Building Storey: the coverings belong to the same building storey as the space from which they were created.
- Net Area: the area of the covering object
- Length (bounding box): the length of the bounding box of the covering
- Height (bounding box): the height of the bounding box of the covering
Enriching covering objects
In addition each covering object has a relationship to the space it was created from and to the building element it is adjacent to (if a building element was found). These relationships can be used to copy any information from the space and building element to the covering object. This can be done using a template to copy information. When you copy the information you should use the following notations
- From the space: [DC:COVERING:COVERSSPACE]
- Example: [DC:COVERING:COVERSSPACE].Space Name
- From the building element: [DC:COVERING:COVERSELEMENT]
- Example: [DC:COVERING:COVERSELEMENT].Object Class
The recommended approach is to create a template that runs the tool, adds the properties you need to the covering objects and finally copies values from the space and building element to those properties. You can then also colorize the coverings based on their properties for a better visual feedback. You can download a sample of such a template here. The sample shows how to run the tool, add your own properties, populate the properties and colorize the coverings based on those properties. It is easy for you to adjust this sample to your own use cases.
Use-cases for covering objects
Covering objects are great for example for quantity take-off. Instead of using for example a ‘Walls Area’ property of the space object, you can use the covering objects for calculating the wall areas e.g. for painting. This allows you to better visualize and understand the quantities you are calculating. It also allows you to be more precise, for example calculating all areas for gypsum board walls in certain kind of office spaces vs. for example brick walls in corridors.
Space coverings are also useful for 4D simulations, where you can use the covering objects instead of the space objects. You can visualize in detail which surfaces are worked on; floors, ceilings and walls.
Sometimes your model may already have separately modeled coverings for example in bathrooms where you may have different materials against the same wall. In this case you can exclude those objects when you create the space coverings and then use a combination of modeled and generated coverings.
Exporting coverings to IFC
When you export a new IFC file the coverings are exported as IfcCovering objects and can be viewed and used in any application that supports IFC. If you do not wish to export the covering objects, please exclude them before exporting.