Add Your Own Properties to the Model
When you add your own properties to the model you need to take the following 3 steps
- Define your properties. In addition to the name each property must have a data type (text, number, length etc.) and optionally a mapping to the IFC model, i.e. how your property is written to IFC. Typically your own properties are written to a property set.
- Add your properties. Once your have defined your properties you can add them to object classes, like walls, doors and windows. Separating defining and adding is useful, because this way you can easily add the same properties to multiple object classes. You can for example define a ‘Manufacturer Name’ property and add the same property to doors, windows, furnishing elements etc. Please note that you can also add properties to object groups, such as systems and zones.
- Populate your properties. Empty properties are not of much use, so you need to populate your properties with values. For populating your properties your have the options of copying values from existing properties, deriving values from data you already have in the model or enriching with data from external data sources.
You add new properties to the model using a template. Adding new properties from the user interface is not possible, but then again you will want to automate adding your own properties because you want to be able to add the same properties to many different models. For general information about templates please consult the Template Guide and the instructions for adding templates and applying templates. This document contains the most important information for each step, but you can find all the details in the relevant sections of the Template Guide or in other linked documentation.
Step 1 – Define your properties
Simplebim 10
| Template Worksheet | Template Sections |
|---|---|
| Resources | Define IFC Property (PropertySet) |
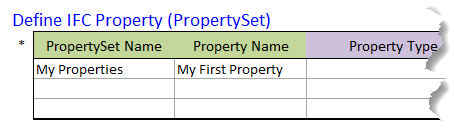
You define a property simply by giving the name of the property set and the name of the property. There are also more advanced options available, but this approach is sufficient in most cases. When you want to add more properties to the same property set, simply give the same property set name and another property name on the subsequent rows.
Older Simplebim versions
| Template Worksheet | Template Sections |
|---|---|
| Resources | Add Identity Source – optional Add Identity (for IFC PropertySet) |

You can optionally start by defining an identity source. Defining an identity source helps you keep your properties organized inside Simplebim, but it is not used when exporting to IFC because the IFC model does not have the concept of identity sources.

Properties always have a name and a key. The key is used inside Simplebim to uniquely identify a property in case there are multiple properties with the same name. The key must be unique and if you want to play it safe you can use the key format defined here, otherwise you can use any keys you want. PropertySets are not created separately, instead you assign a property to a property set and the necessary property sets are automatically created for you.
You can define a Name and a Property Name, but usually it is a good idea to use the same value for both.
The Name is shown in Simplebim and the Property Name is written to IFC. This is useful when you use property names that also exist elsewhere in the IFC model, such as ‘Description’. In this case you could use e.g. ‘Description (Acme)’ as the name and ‘Description’ as the property name. This way you don’t confuse the two properties when working inside Simplebim but still get the IFC export you need.
Step 2 – Add your properties
| Template Worksheet | Template Section |
|---|---|
| Model | Add Property to Object Class or Group |
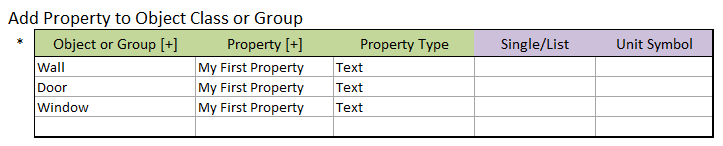
When you add a property to an object class or group you simply give the name of the object class or group, the name of your property and the property type. It is a good idea to use the most appropriate property type for your properties because this enables more functionality inside Simplebim and the applications that use the IFC models you export from Simplebim. For example:
| Data Type | Functionality |
|---|---|
| Text | Human readable |
| Number | Calculations |
| Length Measure | Rounding, unit symbols and unit conversions |
For making your templates shorter and easier to read and maintain you can use substitution lists.
When you add a property to an Object Group the property is added to the Object Group itself, not to the objects contained by the group.
Step 3 – Populate your properties
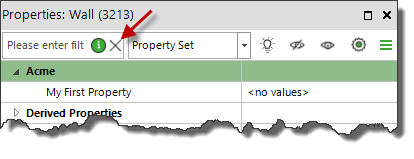
I can’t see my new properties!
When you add a new property to the model, the property is initially empty, i.e. it does not have any values. By default Simplebim does not show empty properties and this may lead you to think that adding the property failed. No worries, you can show also empty properties in the Properties -palette. Simply click on the X icon on the right side of the filter box.
For populating your new properties you have the following options in Simplebim
- Copy values from other properties using the Copy Property Values template section. You can…
- Basic Copy: copy the whole value of one property to another property for all objects of an object class.
- Constrained copy: copy the value of one property to another property for objects that belong to a group.
- Partial copy: copy a part of the value of one property to another property using Regular Expressions. You might for example have a property that has both the space number and space name in it and you want to copy just the part with the space number into your own property.
- Merge copy: copy the value from several properties into one property.
- You might have two or more potential existing properties where the value may be found. You can try both, and copy from the one that has a value this time.
- You might have several properties with the same name in different property sets. In this scenario each object typically has a value for that property in only one of the property sets. You can copy the non-empty values from all property sets to your own property, which results in a single property that has a value for all your objects.
- Reference copy: copy the value of one property from a referenced object to a property on the referencing object. You can copy for example…
- The Space Number of a space to all the objects, like furniture and fixtures, contained by that space
- The name of an HVAC system to all the components that belong to that system
- The classification of an object in a specific classification system
- Combine and calculate values using the Calculate Properties -tools.
- Combine values from multiple properties, for example combine the Space Name and Space Number into one property.
- Calculate values from other properties, for example calculate the length of the door frame from the door height and width (2 x height + width).
- Prior to Simplebim 10 you can also combine and calculate values using the Prototypes add-on
- Combine values from multiple properties, for example combine the Space Name and Space Number into one property. For this you need to use the Combiner tool.
- Calculate values from other properties, for example calculate the length of the door frame from the door height and width (2 x height + width). For this you need to use the Calculator tool.
- Derive values by running a tool and copying values from the properties or relationships created by that tool, for example…
- Run the Calculate Quantities -tools and copy quantity information to your own properties
- Run the Auto-Assign Containment: Spaces -tool and copy space information to objects contained by spaces
- Use the Location Tools to create location information, like sections, apartments, concrete pours etc. to the model and copy this information to your own properties.
- Use Bimsheet to add data from Excel into your own properties
- Use enrichment to add tabular data from Excel into your new properties
- Set property values manually in the Simplebim user interface
- The Properties palette allows you to edit property values
- The Property Value Editor palette allows you, in addition to editing property values, to copy or swap property values from one property to another.
- The Property Value Combiner palette allows you to combine values from different properties into one and define separator characters. You might for example want to combine the Space Name and Space Number properties into one property, such that the Space Number is enclosed in brackets: <Space Name> (<Space Number>)